Friday, 17 August 2012

Good apple year

I really wanted to show you the office already, but there are few minor details still unfinished like the cable to the other speaker and few things of A's are still on the floor. Maybe I'm getting too much of a perfectionist. But believe me it's a lovely room and I'd like to show it to you at it's best.

So... this year seems to become a pretty good apple year. So good that one of the braches in our apple tree broke under the heavy weight.


I actually left the brach still hanging there. There is so much of unharmed bark so the leaves and apples have stayed healthy looking and are still growing. I will cut the branch later in the fall.

Wednesday, 15 August 2012

New soap from old soap

I've got to warn you before we go to the actual post that this could cause some disgust. At least it did that to me.

I have always liked soap bars more than liquid soap. I think it's because of the packaging. I don't like to buy plastic bottle every time I buy soap. I once even had bar shampoo, but that was a bit tricky to use so now I do buy regular liquid shampoo. But on washing hands bar soap works fine. 

Apparently I'm very cheap. Because who in their right mind would save small bar soap slivers. And I'm talking about very small pieces, some of the size of my thumb nail, just few millimeter thick slivers. I have hard time understanding why I saved them, because they disgust me. There is something about used soap slivers, they feel dirty, even though I don't think they are actually any more dirty than a soap bar that has been used once. But for some reason I wanted to save them to make a new bar of soap from them.


Now I had accumulated a small amount of them and I also had two bars of soap formed like an angel. Angels are not my cup of tea. I had had them quite a while, I got them as a present from a friend, but they never ended up next to the sink. I had once a candle that looked like a Santa Claus, I had big problems burning it because it meant that the Santa Claus head would be in fire and then melt. That was just too cruel. I think there is the same problem with the angel soap, I don't want to disfigure the angels by using the soap. I had no problem grating them though.


Here is a great video on how to reuse the old soap. I used that as a guideline when I redid my soap. But I grated my soap, so when I added water to cover the soaps I did not have to use as much of it and I did not have to wait more than 15 minutes for the soap to soften. Okey this is when it gets gross. After the 15 minutes the soap water combination looked like snot and behaved like snot. Yack. Really really disgusting.


I prepared some containers where I could then pour the soap. I had some metal baking forms and also two conserve packages. I just washed the later ones, but I did oil the baking forms to prevent the soap from stucking on them.

Then I heated up the soap water solution and it turned more runny and it was then easy to pour into the containers. I let the soap harden for a day and then tryed to take them out from the containers. The soap was easy to remove from the conserve packages but I couldn't get them out from the baking forms. So I popped the soap with the metal forms to the freezer for about half an hour, when the soap had hardened it was easy to remove the soap.


After 24 hours the soap felt quite soft still and I left the soap to dry on the kitchen counter for a few days. When the water evaporates the soap will get a more harder surface and then they are more easier to handle. Also the soap will loose it's volume quite a lot when the water evaporates, so make sure you make make a big enough soap bar in the first place so you don't end up with a bar of the size of the slivers. I actually think I could have used less water, I think the heat itself will melt the soap and mix it well. I assume the whole process would have been much quicker with much less water. But then I really do suggest grating the soap like I did instead of using big chuncks as in the video.

I don't claim that the soap I remade is pretty. It's actually pretty darn ugly. So I doubt I will inspire anyone to save up their soap slivers, but incase someone was already thinking of doing this he or she could get some hints. I think I could have used some food colouring like the video suggested. But it's just soap, not even the prettiest soap bar will look that pretty once it's been used couple of times.


The dark top on the soaps came from the glitter that the angel soaps had. I first freaked out that I had burned the soap water solution on the stove but then realized those were just the glitter that had sunk to the bottom.

But nice wrapping will always save the day.


Monday, 13 August 2012

Giant washi tape

Look what I got from work! Giant washi tape rolls, two of them!


I don't really understand why the washi tape is such a hit as it is now, but I had also bought few rolls of washi tape with big money. The tapes are seriously expensive.


At work I sit close by to the designers of the company and they have alsorts of interesting material samples just lying about. I admired these washi tape rolls to one of the designers and once she noticed how much I liked them she offered them to me. Apparently they didn't have any use for the tapes.

It is good to open your mouth from time to time and let people know what you are interested in.

Friday, 10 August 2012

Cubbies on the wall


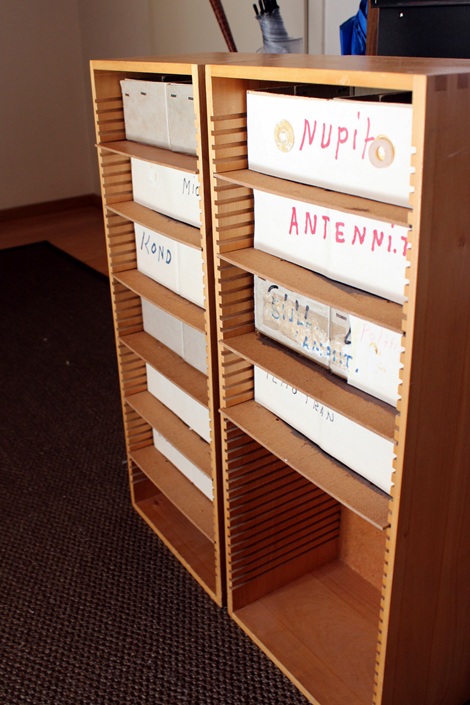
Remember those cubbies I showed long long time ago? Perhaps not. Anyway these were part of the heritage we got some time ago. Since then the cubbies have been waiting for the painting in the office to be finished. That was a long wait.

I took out the shelves with cardboard boxes from the cubbies. The boxes were glued really hard on the shelves and  first tryed to rip the boxes off, but the shelf boards broke and I ended up throwing all the shelves and the boxes to trash. In the end I did not even need the shelves, since I desided to turn the cubbies on their side.

I drilled holes to back plate of the cubbies and asked A to hold the first cubbie on level against the wall. After I marked the places of the holes I drilled the wall and attached the first cubbie on the wall with srews. To level the second shelf with the first one I used books to hold the second cubbie on the wall while I marked the places to drill.


I think the cubbies are super nice and handy too. Here you also see my work surface. We had a table in the office before but I didn't like it's wooden colour, so I bought a new table top from Ikea and attached the old legs to it.


Now I have been filling the shelf (that you can just see in the right there) and the cubbies with stuff. It's unbeliavable that the office is almost finished!

Wednesday, 8 August 2012

Snow to water


I thought it was funny that we decided to have our summer holiday on a place where there is still snow. It was not really summery in the mountains of Norway. It wasn't even hot on the sea level, but warm. Which in a way is good. Car trips in colder areas are more pleasant than in hot ones.


The highest place where we visited was in bit less than 2000 meters (6500 feet) from the sea level. Up there were very litle anything growing. No trees, just grass. Because the fjords are formed like they are we drove up and down and up and down again. Our ears were popping from all the pressure changes.

There was still quite a lot of snow. In Stryn area there is even one ski center that is only open from spring to mid summer since on winter there is too much snow.


 Sun was melting the snow fast and we saw amazing waterfalls. And we saw those everywhere.


In Finnish we have a saying that "Small streams make a large river". Is there similar in English? I tried to google about it but couldn't find anything. Anyway the saying really was visible in the mountains in Norway. The closer to sea level we went the bigger the creeks got.


While we were looking for a cabin for the next night just south from Oppdal we accidentally bumped on river which was the scaryest but yet most beautiful rapid I've ever seen. It was called Magalaupe. It had huge potholes which were formed in the ice age and the water raged through deep grooves in the rock. I'm afraid our photos show no respect to the actually fearsomeness of the rapid. 


I made a map of the route we drove on our trip. Click on the Google map and you can zoom in. I marked all the places we spent a night in with blue and also marked a few of the best places with yellow.


View Norway 2012 in a larger map

Monday, 6 August 2012

All shelves are painted

 
All the shelves are now painted! Finally! 
It took way longer than I thought. I assumed it will take me about one week to finish each side of the room to  paint the walls and the shelves. But it took more like one month to finish each side of the room. Huh, but now they are ready. How amazing is that!

For these shelves I needed to buy quite a lot of paint. I used branch varnish on places where I was afraid the resin would show through the white paint. I think I could have gotten a lot of shelves from lets say Ikea for just the price of the paints. But these shelves we had are expensive brand and they are quite versatile and good quality so it was no point getting rid of those. And new Ikea particle board furniture won't last for decades like these shelves have already done. These are the paints I used.

I painted twice with the primer and one time with the top paint. I had to paint the edges two times, the paint did not stick as well on the edges as on the bigger surfaces. The bigger surfaces were sanded by the belt grinder and the edges by hand and I think there was still more old varnish left on the edges so the paint did not stick as well.


What I did horrible wrong with the painting was the scheduling. I had not realized it takes so long for the top layer to dry, which was three days. The paint will feel dry after few hours, but there was this sticky feeling to it and that was only gone after the three days. I also made the painting more tiring for me because I did it actually in 5 sections
  1. sanding and painting the first shelf from the other wall
  2. sanding and painting the new shelves I bought used
  3. painting the vertical support piece that I used as a drying stand
  4. sanding and painting the second shelf from the second wall
  5. painting the vertical support piece that I used as a drying stand

This makes me realize why it took so long in the end to finish all of the shelf. But it would have been quite difficult to empty all the shelves at the same go, but I atleast should have bought the new (used) shelves earlier so I could have combined painting them and the first shelf at the same time. Well... live and learn.


Ah, but how I do love them! Maybe I love the shelves even more because of all the work the painting included. I'm so happy.

Friday, 3 August 2012

Hilsen fra Norge


I'm back! Greetings from Norway!

On our summer vacation we headed to Norway to see the amazing fjords. I had been to Norway when I was a kid but I did not remember much from there. A had been in north of Norway so this time we visited the south parts of Norway.


We took the ferry from Helsinki to Stockholm and drove from Stockholm to Oslo. In Oslo we spent one night and then drove to the North West area from Oslo where there are many fjords. We took an astronomical amount of pictures. All the places and views were just so amazing.


We drove a lot, but even with just the views it was worth the drive. Will show you more pictures of the mountains and the beautiful waterfalls later.

Related Posts Plugin for WordPress, Blogger...