Showing posts with label bathroom. Show all posts

Monday, 17 March 2014

Replacement bathrobes

You might remember that I mentioned that I have replaced some of the items I got rid off on the Minimalist game. Two of those items were bathrobes. In theory there was nothing wrong with those robes, but the only occasion where it ever occurred to us to use the robes was after sauna. I'm not sure you know but after sauna you will get sweaty really easily if you feel even a bit too warm. That is what we call after sweat in Finnish. But after having sauna it's nice to hang out and relax and it's preferably done in a bathrobe, but our robes were just way too hot. Once you put them on you were sure to have after sweat issues.

For years I have been thinking of replacing the robes with Japanese yukata. Yukata is similar to a kimono, but it's made from cotton and is way more casual than the kimono. Yukata is also very simple to sew and so I assumed I could make ones for us, but I've postponed making those for years now and so I felt that it's very unlikely I will ever be inspired to start those and decided to buy them.

 
I bought two similar yukatas, both were from the men's section of the online store, there were nice patterns on the women's side too, but I preferred to have both the same and I like the simple stripe pattern which was only sold on the men's side. With the yukata also came belt on the same pattern, it's standard that the belt is not attached to the yukata robe in any way, but I think I will make some sort of belt loop for it, just so that it is easier to use.


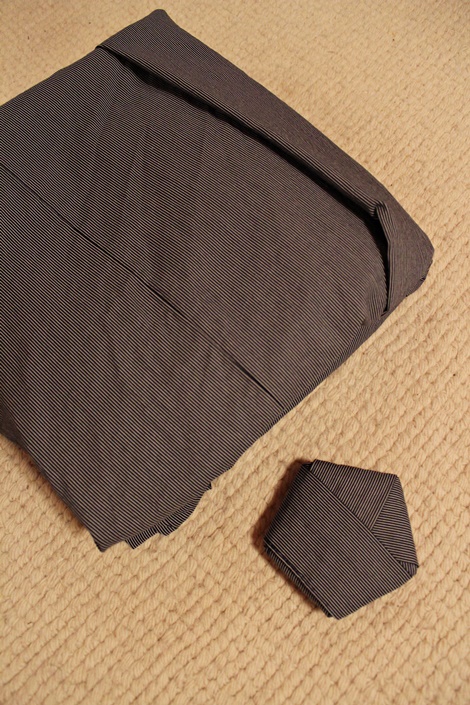
I know the yukata is nothing as fancy as a silk kimono, but I would love if we had one wall in the bathroom where I could keep one of the yukatas hanging from a bar as shown in the first picture. It would just look so good.

And no after sweat problems anymore. Yay.

(I'm not getting payed to link to the Kimono shop, I just bought mine there, and I'm happy with them, but I'm sure there are many more online shops similar to the one I've linked here)

Monday, 24 February 2014

Better safe than sorry

So far Likka does not move much, but suddenly one day she will somehow crawl/drag/walk to a place where she should not be allowed to go. Our neighbour mentioned about an insident where their first born had somehow managed to move herself into the kitchen and had eaten some dishwashing detergent, which is highly irritating. Their kid did not get injured, but ofcourse they had to visit the hospital because of that.

With that story in mind we moved the dishwashing detergent to a higher cabinet and now I also moved the laundry detergents higher in the cleaning cabinet. They were kept on a quite low shelf before.


There are many things in our home which we might need to move higher or reorganize as Likka grows, but now atleast these chemicals are out of reach of the little hands.


Wednesday, 11 December 2013

Prettifying trash cans

Before Likka was born I put together a diaper changing area in the bathroom. At that time I did not really pay attention to the trash cans that are needed for the used diapers, I just took two bucket from the cleaning cabinet and placed them on the bathroom floor.


It was practical but the buckets were not that beautiful, besided we need those buckets from time to time for other purposes. I originally did not pay that much attention to the diaper trash cans since we will not need them forever and so I did not think this would be that important, but once I realized that kids can wear diapers till the age of two I started to think otherwise. Two years is a long time to look at ugly buckets.

So once I realized that I was on a look out for more beautiful buckets or trash cans. Then I bumped into a pair of plastic trash cans at a trift store. The trash cans are originally from Ikea and not so beautiful on their own and as they were used they were also dirty.


To prettify the trash cans I used black electric tape and adhesive shelf paper which I happened to have at home and of course washed the trash can properly.


So much better I think, I think they are fun and nice looking.

Friday, 20 September 2013

Diaper changing pad

The diaper changing setup did not really work that well. I had a towel and a terrycloth lined with plastic on the diaper changing place. We soon realized that the terrycloth was way wrong material, because Likka pees and poops on the diaper changing place and the terrycloth needed to be changed often. After two days at home we flipped the terrycloth around so that the plastic side was on top. That worked way better. But we also felt that something more bulky could be used as a pad instead of the towel. 


When I made the cradle for the terrace I cut up a baby matress for it that we had bought from Ikea. The matress had to be cut lot smaller and I was left with big pieces of matress. I'm glad I did not throw away the pieces, because those happened to be the perfect size for the diaper changing place, it just fit there like a glove. So from the pieces I made a diaper changing pad. 


We did buy a piece of plastic tablecloth. So not all the material was handily available, and it might be that the ready made pad from a store would have been even cheaper than the pad I now made, but I did not want the pieces of the matress to go to waste.


It's not too easy to sew plastic, but it worked out somehow. I left the underside of the pad bare, because the matress has a really good friction against the counter top and it stays on place very well that way.


I'm really happy about the pad, I like the dots and it's easy to wipe clean now. We do not have any cotton cover for the pad. We have a cotton rag on the pad and after washing Likka we use the rag to dry her. Often the rag is not so clean after and we change the rag almost after each use.


Friday, 13 September 2013

Origami bird mobile


I made a origami mobile to hang over the diaper changing place. The mobile frame itself is from Granit. The origamis I folded with the help of this site. I made mainly birds for the mobile, there is one dinosaur too just because I wanted to make a dinosaur and birds evolved from dinosaurs anyway (maybe not from tyrannosaurus... but what ever).


After taking taking these pictures I removed the one extension piece from the mobile, because A hit his head on the mobile while changing diapers. I'm sure Likka does not even see that far, it mainly humors me now.

Monday, 9 September 2013

Diaper changing area

We did not get a separate changing table for the kid to the bedroom. I assumed it would be best to change the kid's diapers in the bathroom where there is running water close by. Also our bathroom has a good amount of counter space so a free standing changing table was not needed. I just had to remove the candles from the top and some towels from the shelf to make a place for the diaper changing.


We were going to buy a changing pad and I did look for one from flea markets and charity shops, but I did not see any. I know I could buy one from a regular store, but I've never got around to that section in the supermarket. So I just folded a towel on the counter and covered it with a terrycloth that has a plastic lining. Then I added some baskets, where we now keep the diapers, spill rags, lotion and other items related to diaper changing or washing and bathing. It was surprisingly easy to create a diaper changing place. No idea yet if the items on the area are useful or not.


Monday, 29 April 2013

Hooded baby towels

We have huge amount of towels, I have tried to reduce their number by donating the not so nice ones and making rags of the really worn ones, but still we have too many. For the kid I made hooded towels from our own towels. I took three towels from the closet and cut from each of them a big square piece and one triangle. I first made the regular white one from a towel we have apparently stolen from a cruise ship (ups, sorry). It had the shipping company's logos on it and it was bit embarrassing to use. I cut off the logos and made the hooded towel from the rest. I used an bias tape on all the edges. I did want to use some other colour, but the brown was the only one I had enough of.


The white was a bit of a practice towel but the next ones I made funnier. In a book Strömsö there is a towel made for much bigger child, it's a orange towel with pointy ears and a white tail, the towel is like a fox. So from that I got the idea of making other animal towels. First I chose to make a frog from a green towel we had. The green towel had a pair from a light blue towel and since I did not want to leave that without a match I wanted to use the blue towel as well. I had bit of trouble figuring what character to make from the blue one, but I chose to make a shark from it. I think the towels turned out super cute and fun. 


There could have been so many options on what characters or animals I could have made from different coloured towels. I was also thinking of making some kind of monster from a lilac towel, but how many hooded towels does a kid need!


Monday, 18 February 2013

Sauna drinks

For all you who have a sauna, ever have drinks with you in the sauna? We sometimes do and if there happens to be snow outside we collect some to a bucket and push the drinks into the snow. The snow keeps the drinks cold for a very long time.


Wednesday, 15 August 2012

New soap from old soap

I've got to warn you before we go to the actual post that this could cause some disgust. At least it did that to me.

I have always liked soap bars more than liquid soap. I think it's because of the packaging. I don't like to buy plastic bottle every time I buy soap. I once even had bar shampoo, but that was a bit tricky to use so now I do buy regular liquid shampoo. But on washing hands bar soap works fine. 

Apparently I'm very cheap. Because who in their right mind would save small bar soap slivers. And I'm talking about very small pieces, some of the size of my thumb nail, just few millimeter thick slivers. I have hard time understanding why I saved them, because they disgust me. There is something about used soap slivers, they feel dirty, even though I don't think they are actually any more dirty than a soap bar that has been used once. But for some reason I wanted to save them to make a new bar of soap from them.


Now I had accumulated a small amount of them and I also had two bars of soap formed like an angel. Angels are not my cup of tea. I had had them quite a while, I got them as a present from a friend, but they never ended up next to the sink. I had once a candle that looked like a Santa Claus, I had big problems burning it because it meant that the Santa Claus head would be in fire and then melt. That was just too cruel. I think there is the same problem with the angel soap, I don't want to disfigure the angels by using the soap. I had no problem grating them though.


Here is a great video on how to reuse the old soap. I used that as a guideline when I redid my soap. But I grated my soap, so when I added water to cover the soaps I did not have to use as much of it and I did not have to wait more than 15 minutes for the soap to soften. Okey this is when it gets gross. After the 15 minutes the soap water combination looked like snot and behaved like snot. Yack. Really really disgusting.


I prepared some containers where I could then pour the soap. I had some metal baking forms and also two conserve packages. I just washed the later ones, but I did oil the baking forms to prevent the soap from stucking on them.

Then I heated up the soap water solution and it turned more runny and it was then easy to pour into the containers. I let the soap harden for a day and then tryed to take them out from the containers. The soap was easy to remove from the conserve packages but I couldn't get them out from the baking forms. So I popped the soap with the metal forms to the freezer for about half an hour, when the soap had hardened it was easy to remove the soap.


After 24 hours the soap felt quite soft still and I left the soap to dry on the kitchen counter for a few days. When the water evaporates the soap will get a more harder surface and then they are more easier to handle. Also the soap will loose it's volume quite a lot when the water evaporates, so make sure you make make a big enough soap bar in the first place so you don't end up with a bar of the size of the slivers. I actually think I could have used less water, I think the heat itself will melt the soap and mix it well. I assume the whole process would have been much quicker with much less water. But then I really do suggest grating the soap like I did instead of using big chuncks as in the video.

I don't claim that the soap I remade is pretty. It's actually pretty darn ugly. So I doubt I will inspire anyone to save up their soap slivers, but incase someone was already thinking of doing this he or she could get some hints. I think I could have used some food colouring like the video suggested. But it's just soap, not even the prettiest soap bar will look that pretty once it's been used couple of times.


The dark top on the soaps came from the glitter that the angel soaps had. I first freaked out that I had burned the soap water solution on the stove but then realized those were just the glitter that had sunk to the bottom.

But nice wrapping will always save the day.


Wednesday, 30 May 2012

Toilet renovation - for now

I've been writing and writing about how I will show a finished toilet renovation soon. That is finally happening now. But the post is not going to be the post I wanted it to be. I had really planned to paint the radiators in the toilet and I still haven't done that. I have an excellent excuse though, I noticed I cannot close the other radiator so it's constantly hot. I doubt it's wise to paint a hot radiator. I need to ask someone to come and check the valve, since it's somehow stuck. That is why I haven't painted the other radiator either. But I did paint the metal sheets that cover the holes to the piping. Since I doubt I will truly finish the toilet anytime soon I will post this post of the toilet renovation now before I forget the whole subject.

Also I realized that I did not take any proper before pictures of the toilet. Well I had planned to only change the silicone so I did not know to take pictures of the whole toilet. This is the best I can show. It's from the phase when I had started to remove all the accessories from the toilet.


I was hoping I would need to paint only once since the original wall colour was sort of white, but it still required two layers. I removed the toilet lamp too and used a table lamp so I could see at least something.


I did also paint the towel rack and then finally just few days ago the metal sheets. The toilet does look very fresh and white, but now the radiators and the door frame are really shouting to be painted. That might happen some day. Maybe.


That radiator on the top of the toilet seat is the one I cannot close and I'm pretty sure it has never been white, but I'd like to paint that too. And I was thinking of painting the screws which I attached the metal sheets to the wall with but I don't know if I'm up to it.


So there it is, the finished toilet renovation - for now.

Friday, 18 May 2012

Silicone again

Sorry no post about finished toilet renovation. I had planned to paint the radiators and the metal covers from the toilet, but on Thursday morning I realized I did not have any paint for metal and Thursday was a holiday here because of the Ascension day, so all stores were closed. I think I had kind of realized that, because I remember thinking that I should go to a hardware store on Wednesday, but then didn't feel like going.

That is why I will bore you with another silicone post. I had some silicone left in the tube and also we had the ugliest silicone joint in the bathroom between the toilet seat and the floor.


Yuck!! We had the bathroom toilet seat changed some time ago because it leaked and the guy who put a new seat there did a horrible job with the silicone. First of all it seems that he had not wiped the floor after he had installed the toilet seat but left all the gunk there. Then he also used clear silicone so all the gunk he left under it can be seen. Horrible!

I removed all the silicone using the carpet knife again. Looking at the silicone from so close and it beeing around the toilet seat made me feel sick. Then I also got a small cut to my finger from the carpet knife and I imagined getting a horible sepsis from the ickyness in the knife and dropping dead in no time.

I'm still alive, luckily with no sepsis.


Then I taped the edges and borrowed A and his thumb to press and even the silicone. I felt that my fingers were just too small for this place.


Ah, so much better. Now it feels clean.


Wednesday, 16 May 2012

New silicone in the toilet

I didn't meant to do much any renovation in the toilet, my first plan was just to change the silicone in the joints around the wash basin and between the tiles and walls. But I ended up ripping all the accessories off the walls and painting the whole room. I've done all that, but I haven't yet placed things back in the toilet and there are still the radiator and few metal covers that could need some painting.

The original silicone was in some places gone all yellow, it looked discusting. Also in some areas the silicone was not neatly placed.


I removed the silicone using a carpet knife. A co-worker tipped to use a carpet knife with pulling the knife part as long as possible and holding the knife very close to the surface where the silicone needs to be removed from. That was a very good tip. I have previously used a regular knife and it was real difficult to remove the silicone. With this tip it was surprisingly easy.


While I was removing the silicone I got a close, maybe too close, look of the painted walls and noticed they weren't really white anymore, more like yellow and had scratches and holes. Then I desided to paint all the walls. I will show you more later but it was good to be able to paint the walls also underneath where the silicone went. It makes the edge nicer.


I taped all the areas where I used silicone so the silicone wouldn't go all over the place. Then I squeezed silicone on the joint and went over it with a wet finger. Many times I had squeezed way too much silicone on the joint so I ended up removing lot of the silicone with my finger. I would not like to waste, but on the other hand the silicone wont stay soft in the tube for that long, so it would go to waste anyway.


I removed the tapes immediately, since the silicone dries fairly fast.


In some places I either pressed too hard or my fingers are too smalll so the corner in the silicone joint came a bit too small and in some places the colour from under the silicone can be seen. Like in these tiles which had a dark unfinished edge.


But I think that's ok. The silicone is so, so much better now than it was, so I'm not going to be discouraged by few minor details. I will most likely show you more of the toilet renovation on friday, but we'll see if I get the finishing done.
Related Posts Plugin for WordPress, Blogger...