Showing posts with label woodwork. Show all posts

Friday, 29 August 2014

Flood in the kitchen

Our dishwasher broke, it leaked most of the washing water on the kitchen floor. New washers are very energy and water efficient but our old one was not (it was 30 years old!) and so we had a real flood in the kitchen. Also bad thing is that we have a parquet in that room and you know what happens to parquet when it gets wet, it starts to bubble. I did dry the floor with bathing towels right after the dishwasher had leaked and I assumed that a good drying with a fan would be enough and there would not leave any damage. Next day my dad came to help with removing the old washer and while here he came to the conclusion that the floor will not dry nicely and since he is not a person to waste time he started to rip off some strips from the parquet. We had some parquet left over from some previous renovation and next day my dad and A put the new old pieces of parquet on the floor.


So now we have a new floor. There is bit of a colour difference between the "new" parquet and the old, but I'm fine with that. I have for quite some time planned to do some bigger renovation to the kitchen, so there is no point changing the whole floor now. But that wont happen any time soon. And besides the floor was not that perfect before either, so this colour difference is not a big deal. Next we need to buy a new dishwasher. Oh and put the moldings back.

Monday, 5 May 2014

Toy basket

So far Likka does not have a huge quantity of toys but enough to over flow a small basket. In no time she will have doubled and tripled the amount of toys she has, even if I personally would not buy any toys for her.


I personally think it's easier to put stuff where it belongs if the stuff fits there well. So I decided to have a bigger basket for Likka's toys. Since it's bigger and therefore heavier to lift I wanted to add wheels under the basket. My dad found wheels from his supplies and I already had the basket. I wanted to make the bottom of the basket sturdier and so I also got a piece of plywood from my dad. I want the basket to be so sturdy that it can hold Likka when she is older (heavier) in case she crawls in it.


The wheels I attached with screws and nuts. I drilled holes through the basket and the plywood and then tightened the screws. The nuts are now inside the basket and bit pointy, not sure if I should cover them somehow.


I did place the lining of the basket inside, which I had done before, and it does cover the nuts a bit, that might not be enough though. Love the basket. If we declutter the items inside once in a while this basket should be large enough for quite some time.


~ ~ ~
You might remember the basket when we were using it as a cradle. Likka had not slept in the cradle for a while and so it was time to let go of it. 

Wednesday, 28 August 2013

Head"board"

Creating a headboard for our bed has been on my list of to-do's for years. Now because the kid is on it's way and we have placed the crib in the bedroom in the foot of the bed, there really is no room for a headboard. There is only a narrow path between our bed and the crib and even with the slimmest headboard the path will get too narrow, we need every cm/inch we can have there.


Instead of a proper headboard I thought of hanging a canvas on the wall to represent a headboard. I had bought a Marimekko fabric Räsymatto long time ago for a totally different project, which I then desided against on. Since I had that fabric and I still like it a lot just not with the project I originally thought of, I used that for a headboard.


I bought a piece of molding, cut that a bit wider than the fabric, then drilled two holes on the ends of the molding. I painted the ends of the molding with the same paint as I had painted the bedroom walls.


I sewed a casing on the top of the canvas where the molding goes through. Then drilled two holes high on the wall and hung the canvas with screws. I did also touch up the heads of the screws with the wall paint so those would be less visible.


I have seen these types of fabrics hung on the head of the beds in various design magazines. I must admit that I'm quite sceptical if these are very handy. I know they can look good, but what will happen when we lean onto the wall? Because I do not know anyone who will just lean, people will also slowly slide down against the wall. Will the fabric stretch or even rip eventually? Any experience, anyone?

Wednesday, 10 July 2013

Raised beds for vegetables

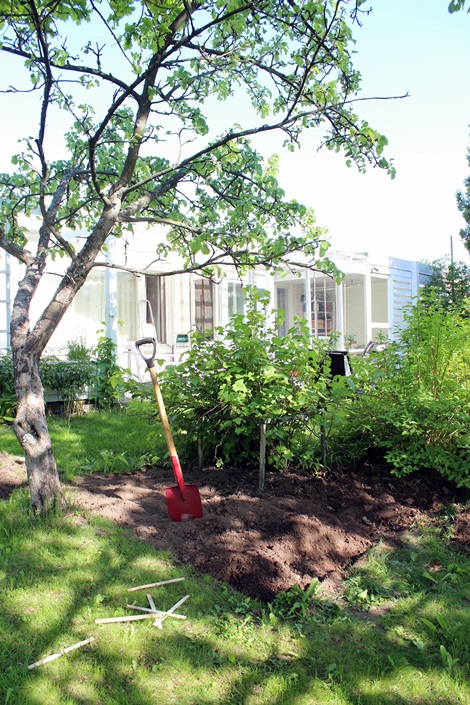
I have long wanted a place in our back yard where to grow vegetables. For a long time I thought I do not have room for any vegetables, but actually once I started to think how we use our back yard and how things are placed in it I figured we do have room. With the vegetable beds I was able to even remove an area from our back yard where the grass had been really annoying to cut. 


It was an area with one apple tree and two black currant bushes which of other never really made any berries and the berries it made never tasted very sweet. I think that bush had grown from a seed and did not have the same good genes as the bush next to it. Also those bushes and the apple tree together with the mock orange bush "fence" were all planted not in a row but to a zig zag shape and grass grew in between them and that made the mowing of the lawn tricky and annoying.


I had removed the bad tasting black currant bush earlier (there was a bit bare spot on the first picture) and then also removed the grass from a fairly large area under the apple tree. Once I had done that I covered the area with a cloth that prevents any plants growing through it (I do not know the name of that cloth in English, and can't actully remember the name of it even in Finnish). I had some bricks that were left over from our front yard renovation and placed those on the edge of the area.


For the raised beds I went to the lumber yard and had them cut me some heat treated wood. I built two wooden boxes from the wood. I did a bit of a mistake with the measurements of the boxes because I measured the area of the boxes with out the bricks, I kind of forgot I had planned to place the bricks to the edges. So the gap between the boxes became way smaller than I had planned and now the gap is really not as functional as it should be, but I don't think that is a big issue. On the bottom of the boxes I stapled some wire net to prevent any rodents from getting in and then I again added another layer of that cloth to stop the soil from running out. I think the first layer of cloth I placed was a bit useless but I did not want to remove it afterwards.

I made the boxes deep, because those are more practical that way. But that meant that I needed huge amount of soil to fill the two boxes. Luckily because of the pipe renovation we had on the fall and on spring they had finished the work and left the front yard bare because that is what I wanted them to do. I have a great plan for the front yard and luckily it does not require soil. So I took some soil from the front yard and moved it to the back yard. I also emptied the compost bin to the bottom of the boxes.


I think the raised beds I made are really elegant and I love the whole area under the apple tree, I also think the woodchips I added under the tree and on the sides of the boxes make the whole place look really finished. I need to sow some grass seeds on the empty spots and then the area is perfect. 


Friday, 9 November 2012

Wood carrying basket by A


Last year we were invited to a wedding, the couple requested a wood carrying basket for a present. Instead of buying one A decided to make one for them.

So he got thin plywood and some round lath. The instructions on how to make one came from a book Strömsö.


Following the instructions A wet the middle part of the plywood and then started bending. He did have bit of problems with the plywood braking slightly from place where happened to be a knot. We later thought that the bending would have gone nicer if he would have used so called aircraft plywood, where the quality is better.


The basket was left to dry for a few days.


The plywood discoloured from the areas where it had been wet most and since there was some braking in the plywood that A had to fix so he decided to paint the basket white.

And why am I only showing this to you now? Well... we forgot to take a photo of the finished wood carrying basket. Then last weekend before the Halloween party we visited the couple's home and finally took the photo of the basket. And we were so happy to see it's in use and in front of their amazing fireplace.


Wednesday, 11 July 2012

Saw dust


After sanding of one shelf the surroundings looked like this. Everything was covered in saw dust, including me.


Monday, 11 June 2012

Sanding the shelf


Before we left for a wedding on Saturday I did manage to sand most of the shelf pieces. I'm a bit annoyed that I did not have time to sand all, there were just a few pieces left. But I had to start putting on makeup and dress up.


I will sand the rest on Monday. On Sunday I also helped my sister move. The move went very fast, she didn't have much stuff and she had moved some of her stuff already. I would have had time to sand the rest of the shelf parts on Sunday but I have a prinsiple of not using any powertools outside on Sundays. I don't want to bother my neighbors with the noise. I at least appreciate that there is one day in a week when everything is quiet and relaxed.

Friday, 1 June 2012

Abacus in sewing theme


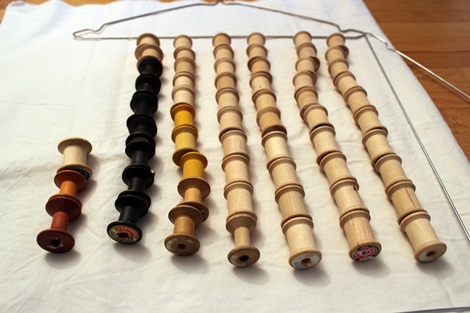
I had these spools, I've had them for a long time. And for an equal amount of  time I've been thinking what to do with those.


I think the old wooden spools are beautiful. I'd like to have them somewhere where I can see them. I went through my craft stash again, like I often do, and I remembered having also wire hangers. And then it hit me to make an abacus. I measured the longest straight edge from the wire hangers, it was just enough to fit ten spools with some leeway. I had seven of those wire hangers so I desided to go with those and not acquire more. I counted the spools, I had 63 spools. So not 70, but that's ok, lets assume some spools have broken off from the abacus over time.


I also needed to make a frame for the abacus. For those I needed to go to the local lumber yard and buy small amount of lath (please let me know if the wood is called something else). I like the local lumber yard, the boys there are really helpful in their odd rude dude like way. I always need such a tiny amount of anything but still they cut the wood and help me like any other customer who buy truck loads of wood.

I had been meaning to loan a mitre box from A's dad, but when we last visited A's parents I forgot to ask about it. Which was dull because I needed it for my abacus project. Then A bought me a present, a mitre box! One day he came from work and had one with him. The best gift ever!


After I had cut the pieces, I drilled small holes on the sides for the wires. Then I assembled the frame with glue and staples. I didn't have anything to press the edges together so that is why I stapled them from the back side. I used a straight angle to measure that the frame is not crooked before I stapled.


I made the abacus for my craft area which is not yet done. That is why cannot yet place the abacus to the place where it belongs, so I took pictures just in front of the unfinished wall in the office.


I think it turned out great, it's my new favourite thing in the office. I'm not planning to treat the wood in anyway, I want it to be as unfinished as most of the spools.


I'm trying a new thing here and I'm linking this to


Ps. You might have saw this post on Wednesday, since I accidentally posted a unfinished version then

Friday, 11 May 2012

Ladder experiment

Irkku made an excellent suggestion about how to keep the used clothes easily available and on open but still looking somewhat neat. She suggested I could use decorational ladder to hold the clothing. Something like this. That was a super cool idea!

I could have bought ladder like that but I happened to have old ladder at home that were of no use anymore because they were not really sturdy.


You don't have useless old ladder lying around in your house? Seriously? I find it somewhat amusing that we just happened to have ladder around the house with no purpose what so ever, just makes me wonder what other stuff we have that is never used.


The ladder was covered in paint splatters and it had splinters in some places so I scraped the biggest paint splatters away and sanded the whole thing. I used a belt grinder to sand the bigger surfaces and the smallest nooks I sanded by hand. I tried to especially sand well the steps since the clothes will be hung from them and if there is even a tiniest splint it might damage our clothes. I admit I got a little bored of the sanding, there were so many tiny nooks and I just got tired. I might need to continue the sanding later if I get some proper tools, maybe a mouse sander could be convenient. We'll see...

I actually removed the table from the bedroom and placed the ladder there. We were able to move the table in the entry. I think it's a bit crowded there now, but it's there for the time being.


The ladder might look bit more rough than what Irkku originally suggested, but I think the ladder looks great in the bedroom, and if I ever get tired of the old industrial feel I can buy a decorational ladder. And then I will actually know if this ladder thing works for us or not.


Oh and we finally got the table fan we've been thinking of getting since last summer which was a hot summer! The fan is quiet and made fully of metal and reminds of an aircraft engine. Love it!

Oh and here is the before. I hope we are unable to cover the ladder up in clothes like we did with the table.

Related Posts Plugin for WordPress, Blogger...