Monday 30 September 2013

Minion hat


I saw on the blog Puistolassa crocheted Minion hats and just had to make one for Likka. I made it too big of course, but better too big than too small.


Lots of people have knitted and crocheted similar ones, just check google.
And what is Minion? Check here.

Wednesday 25 September 2013

Patchwork cubes

I think I've loaned and read all the crafts books related to babies from the three nearest libraries. Most of the books have had very nice new projects I could try, but only a few of them have inspired me to actually start anything.

On a book Gifts for Baby by Catherine Woram was a project to make patchwork cubes for a baby. All the projects in the book are awfully pastel coloured, but none the less this project I was inspired to start because I happened to have all the material at home.


I cut out cubes from the baby matress pieces I still have left over from other projects. And of course I have pieces of different fabric. Then did some cutting and some sewing.


In the middle of making these I started to question if making these is even worthwile, because sewing these was really slow and I should have better things to do now than something like this. On the other hand it was quite relaxing to sew them, such a monotonous work. But I'm really glad I had cut only eight cubes from the matress.

Well, got these done anyhow.


Monday 23 September 2013

Potato growing bags, part two


I'm really super duper late with this post. This really isn't the right time anymore to start growing potato. Remember the potato growing bags that looked like trash cans? I made them because I got white plastic from work. Before I had received the plastic I had thought of making potato growing bags from tarpaulin, but changed my plans because of the free plastic, which then turned out to be an ugly idea.

After making three ugly trash can bags I decided to go with my original idea. My original idea was inspired by these hideously priced Bacsac growing bags or these bit more modestly priced Zigg Zagg ones. The Bacsacs do look nice at least the colourful ones, but Hello! I won't buy them at that price. The Zigg Zagg ones I could had bought but the colours are all wrong.


I wanted my potato bags to be white and so I bought a white tarpaulin with less that ten euro. Then sewed bags from that. I made two sizes, one with diameter and hight of about 40 cm and other with 30 cm. For both I cut a square, folded that in half and sewed the long egde together. Then turned the top over the bottom half, so that the seam was now left inside the two surfaces. After that I tucked in the sides of the tube and sewed the bottom close.


Then I sewed on a handle, so the bag is easier to move if needed. For the bigger one I sewed the handle to go all the way through the bottom, because I want it to support the bottom a bit. But I admit that it was quite difficult to sew, so on the smaller one I just sewed two handles on the sides. Since I made only two bags from the tarpaulin so I'm still left with a HUGE pile of it.


So I did not put potato into the bags, instead in the smaller one I planted some fall flowers and the bigger one I'm using to store some clothes of the kid. Next summer I can use the bags as I originally intended. The bag is not maybe the prettiest one for flowers. The point in using bags as containers is that those can be collapsed later when container gardening season is finished.


Please ignore the fact that I put way too little soil into the bag and the plants are now too deep to look their best.

One thing I would like to mention. Do not use cotton thread if you plan to grow something in this type of bag, it will compost, it's better to use polyester thread, that should last longer. 

Friday 20 September 2013

Diaper changing pad

The diaper changing setup did not really work that well. I had a towel and a terrycloth lined with plastic on the diaper changing place. We soon realized that the terrycloth was way wrong material, because Likka pees and poops on the diaper changing place and the terrycloth needed to be changed often. After two days at home we flipped the terrycloth around so that the plastic side was on top. That worked way better. But we also felt that something more bulky could be used as a pad instead of the towel. 


When I made the 
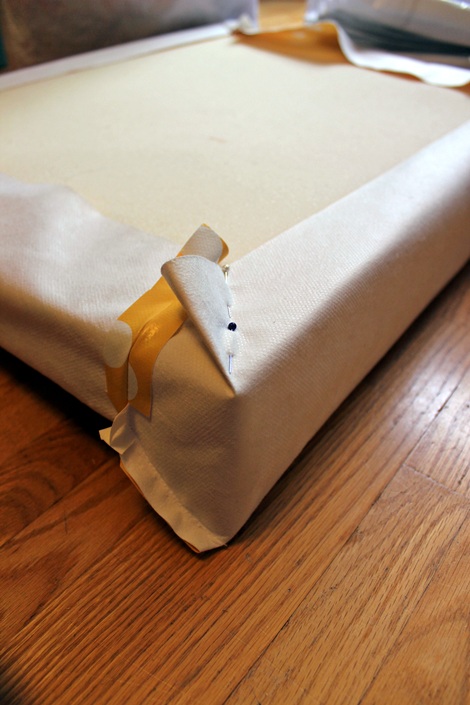
cradle for the terrace I cut up a baby matress for it that we had bought from Ikea. The matress had to be cut lot smaller and I was left with big pieces of matress. I'm glad I did not throw away the pieces, because those happened to be the perfect size for the diaper changing place, it just fit there like a glove. So from the pieces I made a diaper changing pad. 


We did buy a piece of plastic tablecloth. So not all the material was handily available, and it might be that the ready made pad from a store would have been even cheaper than the pad I now made, but I did not want the pieces of the matress to go to waste.


It's not too easy to sew plastic, but it worked out somehow. I left the underside of the pad bare, because the matress has a really good friction against the counter top and it stays on place very well that way.


I'm really happy about the pad, I like the dots and it's easy to wipe clean now. We do not have any cotton cover for the pad. We have a cotton rag on the pad and after washing Likka we use the rag to dry her. Often the rag is not so clean after and we change the rag almost after each use.


Wednesday 18 September 2013

Handling a wrong size spool

I needed to zig zag some rags quickly, but I wanted to use up some of my yarn that are on various size spools and cannot normally be used on my sewing machine.


Normally the yarn would be on the place where the green arrow is, but the spool I had did not fit onto that. The hole in the middle of the spool was just too small. So I took a roll of tape and just placed the spool into the roll. That is where the red arrow is. It held the spool on place well enough and I was able to use up the yarn from the spool. Any type of container would be good enough for this, a mug, flower pot, just something heavy that will not move with the spool.

Friday 13 September 2013

Origami bird mobile


I made a origami mobile to hang over the diaper changing place. The mobile frame itself is from Granit. The origamis I folded with the help of this site. I made mainly birds for the mobile, there is one dinosaur too just because I wanted to make a dinosaur and birds evolved from dinosaurs anyway (maybe not from tyrannosaurus... but what ever).


After taking taking these pictures I removed the one extension piece from the mobile, because A hit his head on the mobile while changing diapers. I'm sure Likka does not even see that far, it mainly humors me now.

Wednesday 11 September 2013

10 little fingers, 10 tiny toes


♥ The cutest baby in the whole world was born on the 5th of September ♥
Now she is home with us and we are all doing very well.
Lets call her Likka here on the blog.

Monday 9 September 2013

Diaper changing area

We did not get a separate changing table for the kid to the bedroom. I assumed it would be best to change the kid's diapers in the bathroom where there is running water close by. Also our bathroom has a good amount of counter space so a free standing changing table was not needed. I just had to remove the candles from the top and some towels from the shelf to make a place for the diaper changing.


We were going to buy a changing pad and I did look for one from flea markets and charity shops, but I did not see any. I know I could buy one from a regular store, but I've never got around to that section in the supermarket. So I just folded a towel on the counter and covered it with a terrycloth that has a plastic lining. Then I added some baskets, where we now keep the diapers, spill rags, lotion and other items related to diaper changing or washing and bathing. It was surprisingly easy to create a diaper changing place. No idea yet if the items on the area are useful or not.


Friday 6 September 2013

Uh-oh, it wont hold


Don't worry, we still have the headboard canvas. This post is about the bedside tables, I just used the above picture to show those bedside tables, incase you've forgotten what they are like.

After painting the bedroom and reinstalling the bedside tables the old fixings didn't hold up anymore. My bedside table, on the left, was a bit loose even before the reinstallation. But now even A's side was coming off from the wall.


See, it's loose and it was starting to feel bit scary, I was afraid to place my drinking glass on the table, it felt like that could collaps the whole thing. So off to the hardware store I went and I bought special drywall anchors, I had previously used just regular plugs, which even might had been too big. I don't think they squeezed the wall well. Then I removed the tables and I saw that the old plugs were definitely loose. I pulled out the old plugs.


The drywall anchor was screwed to the drywall. It seemed really solid, I guess sometimes buying the right gear makes all the difference. 

No gap anymore, whew!


Wednesday 4 September 2013

More painting - corridor

I must have complained to A that I have nothing to do because he suggested that I could paint the corridor while I'm on the maternity leave. And so I did. Besides it desperately needed painting. It had holes and scratches and it looked quite horrible. Under is an example.


Prep work started with removing the moldings and spackling the holes. Once the spackle was dry I sanded those and then washed the walls. Then I taped all the egdes and covered the floor. The taping is something I hate, it takes such a long time and usually the paint egdes do not end up that nice even with the tape.


Next day I started to paint, first the edges, then the bigger areas with a roller. I usually paint the edges first twice then the main wall, then again the edges and once more the main walls.


Third day was spent to attaching the moldings back and placing the picture ledges back. (The picture ledges by the way have pictures of our family. I've made a post about it long ago, it can be found from here. It is still missing A's photo, he has not chosen a photo to show.)

Loving the crisp white. Wonderful to have that done. And don't you just love our ceiling light in the corridor? Changing the light fixture has also been on the to-do list forever. I wonder when I find something there.

Monday 2 September 2013

Craft foam stamp

It is easy to decorate plain white clothes, bed sheets or paper by stamping. I was mainly thinking that I could stamp the kid's clothes. I have always liked owls, so I desided to make my own owl stamp. I guess I could have also found an owl stamp from some online shop, but I've also always wanted to try out how to make my own stamp.

Since I wanted to make quite a big stamp I chose to use craft foam for it. If I would have wanted to make something smaller I would have most likely chosen to carve a stamp out from an eraser. I drew a picture of an owl, simplified it a bit and then cut the form with a craft knife through the paper and tried to cut through the foam too, but that did not completely work so I also had to cut the foam with scissors.


For the back of the stamp I cut a piece of plywood and glued the foam onto the plywood with super glue. I stamped the owl image on a paper and used varnish to attach that on the other side of the plywood. I wanted to put the image there so it would be easier to know which way is up on the stamp when stamping. The varnish did spread out the ink on the paper a bit and the stamp does not look too pretty anymore. But I guess the usability is the key not how the stamp looks like, besides the stamp will get even uglier when in use and knowing myself I wont clean the stamp that well between uses anyway.


Related Posts Plugin for WordPress, Blogger...