Here are also few pictures from the room, they were taken last spring, but the room has not changed one bit (except that I donated those big pillows on the bed just this saturday).
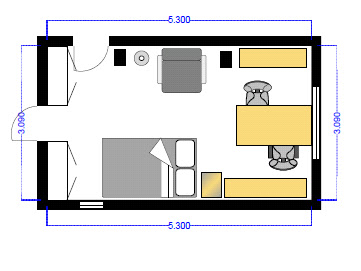
What we want from the room is that it can hold all the paperwork in the shelves, a computer station for A, a guest bed, a table for crafting and sewing and a chair for reading. Also I want it to be open and fresh and white. So here is how the floor plan will be.
And here is what we are going to do: Floorplan
- Buy a Sesam wall bed mechanism and place the guest bed inside a closet (the grey rectangle in the floorplan)
- Move the shelf on the small window wall closer to the small window (the yellow long rectangle)
- Move the table against the big window wall, or even get a new table
- Place a table board inside the shelf (the yellow rectangle on the top right corner) to create a computer station
- Get a nicer looking office chair for A
Building, painting and sewing
- Remove wallpaper and paint the room white or light colour
- Make a closet for the guest bed
- Paint the shelves white
- Sew a roman blind for the big window or get a roller blind
- Sew a slipcover for the chair
I want to thank Kattis for introducing me the Sesam wall bed mechanism. We are planning a trip to Stockholm this winter and are most likely going to buy the mechanism from there. How do you like my plan? Any gaps found? I know it's going to be lot of work. I especially dread the painting of the shelves, that is going to be very labourous, but I hate the shade of the wood the shelves are now.


As long as you lightly sand the shelves, a foam roller will make short work of them--assuming of course, the shelves come out. If not, I'd still use the roller--you just have a bit more cutting in to do. When I did my bookshelves, I used a foam brush--and then threw it away when I was done.
ReplyDeleteThe plan looks good. I assume the shelves will be put together on that wall and that's the only place all four will fit? And when you actually use the room--will you put the chair in front of the bed "closet" --as it will just look like a shelving unit. I assume that the bed is being built to drop down sideways--and not lengthwise?
ReplyDeleteWhat a great thing to have found for the bed, though. Fabulous.
Thanks for the comments Alana. The shelves do come out, which makes the task easier. Foam roller! Thanks that's a good tip.
ReplyDeleteWe did think about having the bed drop down sideways but then desided to have it lenghtwise, that way it takes up much less room. But we can still change that if the lenghtwise doesn't seem handy. Also if it's sideways, there could be a display area on top.
But if we do end up putting the bed lenghtwise we must put it on the door wall, since there is this wooden valance on the small window wall and the bed won't fit under it. Then we must have the shelves separated on different walls like they are now.